Tuesday, May 7, 2013

Taking On Water


This photo was taken on my recent wildlife photo shoot. We eventually made our way to our local duckpond, when we got there a few swans where swimming around the pond. The swan that was closest to me started to drink the water, I thought this made an interesting composition. The swan was in the bright and direct sunlight; this created a complicated exposure. I decided to combat the difficult exposure by using my flash gun.

I had the camera in shutter priority with a shutter speed of 1/1000th of a second locked in. I had such a fast shutter speed selected so that the movement of the dripping water would be frozen. I had the camera set up on my monopod so I didn’t have to worry about any camera shake. I overexposed the flashgun by 3 stops to ensure the most powerfull flash was being emitted. I also overexposed the cameras exposure meter by 1/3rd of a stop.

To edit the photo I increased the contrast to give the photo extra punch and I also changed the white balance, as I thought the photo looked a bit warm. I cropped the photo in a bit tighter as there was quite a lot of dead space behind the swan. The composition looks a lot better after I cropped the photo; it shifts the focus onto the swan. I didn’t change the light levels as I was happy with how the camera had exposed the photo.

Hopefully Bex and I will get a chance to go for a photography wander at some point this weekend. If the weather stays as good as it has been then this weekend should bring some great photos.

Mat

Monday, May 6, 2013

New Growth


It finally feels that spring is here! We’ve had nothing but glorious sunshine, making for a perfect bank holiday weekend. One of the best things about spring is that all the trees that were once bare are now lush and green again, and all the flowers are springing up to cover the ground once again. I love this time of year as it is full of colour which is great for photography and the bright sunlight always creates interesting exposure challenges.

To celebrate the turning to spring I thought I would upload a photo of a snapshot of spring. To best portray this effect I thought that a spring time flower would create the effect I was looking for. I went for a photography wander in our local nature reserve and the ground was covered with new flowers starting their new growth.

I saw a small group of white flowers caught my eye because there was one of the flowers standing out in front of the others. I liked this composition and how it separates the flower from the others in the same way that spring is separated from the other seasons. For the actual exposure I had the camera in aperture priority with an aperture of F5.6 selected to ensure the background was thrown completely out of focus. I had an ISO of ISO 200 selected for maximum image quality. I also overexposed the photo by one stop. This meant the camera chose a shutter speed of 1/100th of a second to complete the exposure.

I didn’t edit the photo because I really liked the effect that I had created in the camera. The exposure was spot on for the lighting conditions and the colours had been calculated incredibly accurately. I also liked the composition I had created so I didn’t crop the photo down.

I’m glad that Bex and I managed to get out for a photography wander today. Most of my photos where of birds again, so expect lots more wildlife photos over the next few days.

Mat

Sunday, May 5, 2013

Landing


Bex and I managed to go out for a wander today, but we didn’t take out cameras with us. So I decided to upload another photo from last weekend’s wildlife photo shoot. I had paused momentarily when I saw a pigeon flying past me out of the corner of my eye. I turned round as it flew past and brought my camera to my eye and took a series of photos as it landed on a branch in a nearby tree. Unfortunately quite a few of the photos were out of focus or slightly blurry, but this one and a few others were pin sharp.

I had the camera in shutter priority with a shutter speed of 1/640th of a second programmed in to remove any camera shake and motion blur. I also had the ISO set at ISO 800 to ensure that a moderate aperture was selected by the camera. I had overexposed by one stop, when I reviewed the photo it looked a bit too bright form my liking; but this was easily eradicated in the editing stage.

To edit the photo the first thing I did was to lower the overall brightness of the photo to combat the overexposing. I also increased the contrast to make the photo look more dynamic. I also cropped the photo as there was quite a lot of dead space surrounding the pigeon; by removing the dead space it focuses the attention onto the main subject.

I’m glad that I got a good photo of the pigeon as it landed. I had quite a few attempts of taking photos of moving birds last weekend but unfortunately most of them were out of focus or blurry; but I think I am slowly getting better at my wildlife photography.

Mat

Saturday, May 4, 2013

Rustic Retreat


This is another photo that I took on my walk home in the sunshine a few days ago. Having previously photographed the buds that looked like flowers, I then noticed that at the bottom of another tree, some leaves had been caught between the branches. I liked the way that the stem of the leaves had been caught between the broken twigs, giving the overall image the effect of “being left behind.”

I tried to under expose the image, as I wanted to emphasise the shadows of the cracks in the branch and the dark specks on the leaves. I didn’t use flash to do this, as I wanted the background to be visible. I was disappointed with the effects of under exposing alone, so decided to edit the image in Photoshop. I decreased the brightness and increased the contrast to make the shadows more striking. I decreased the saturation slightly, as I wanted the photo to look washed out. Finally, I sharpened the image to pick out finer details.

I love stumbling across new things to photograph. I’ve been photographing for so long, I subconsciously look for photographic opportunities everywhere I go. Is that a good thing?

Bex
x

Friday, May 3, 2013

Hiding Away


This is another of the photos I took last weekend which I really liked. The clouds hadn’t broken when I was taking this photo which made the exposure a lot easier to calculate. I didn’t need to use the flash either as the contrast was a lot less between the highlights and the shadows.

I was once again using the camera in shutter priority to ensure that any movement by the bird was removed. I had selected a shutter speed of 1/640th which also ensured that any camera shake is also removed. As I previously mentioned I was wasn’t using the flash by this point as the contrast was a lot lower so the flash wasn’t required to brighten the shadow areas. I left the ISO in auto so the camera selected ISO1000 and an aperture of F5.6 to complete the exposure.

To edit the photo I increased the contrast and lowered the colour tone and the colour temperature. I did this to ensure to enhance the yellow of the bird’s chest and to dampen the vivid green of the tree branch which distracted the viewer away from the bird itself. I also cropped the photo as there was a lot of dead space surrounding the bird.

I’m not sure on which day but both Bex and I are hoping to be able to go out for a photography wander at some point this weekend. I’m sure that we will upload some of the photos that we take while we’re out and about.

Mat

Thursday, May 2, 2013

Swan In The Sun


I took this photo on the recent wildlife photo shoot. I was quite impressed with how this photo came out, it is defiantly one of my favourite photos from the day. The sun was beaming down which made some very interesting exposure problems. The best way I thought to combat the exposure difficulties was by using my flash gun. I thought by using the flash gun it would help to lighten the shadow areas and to even the exposure.

I was using the camera in shutter priority with a shutter speed of 1/400th of a second selected. I had also locked in an ISO of ISO400. As I was using the flash gun the camera selected an aperture of F13. I programmed the flash gun to over expose by three stops; so that it would give out the largest amount of power for the exposure. As I was using a shutter speed faster than the flash-sync’ speed of the camera I had to use the flash n the high speed sync’ mode. This mode sends out a rapid sequence of flashes so that at least one of the flashes happens while the shutter is open. The only downside of using the high speed sync’ function is that it uses the entire charge of the flash gun; so that only one photo can be taken at a time!

To edit the photo I increased the brightness a bit and lowered the highlights to ensure the highlights didn’t become clipped. I also cropped out some reeds that I had accidently included into the frame. After this I changed the white balance for a more accurate colour selection. I changed the white balance as the photo looked a bit too cool for my liking. I didn’t change anything else as I was happy with the rest of the photo.

I very much enjoyed my wildlife photography trip, I’m very pleased with the photos that I took. Hopefully both Bex and I will get a chance for some more photography this weekend.
Mat

Wednesday, May 1, 2013

Illusion


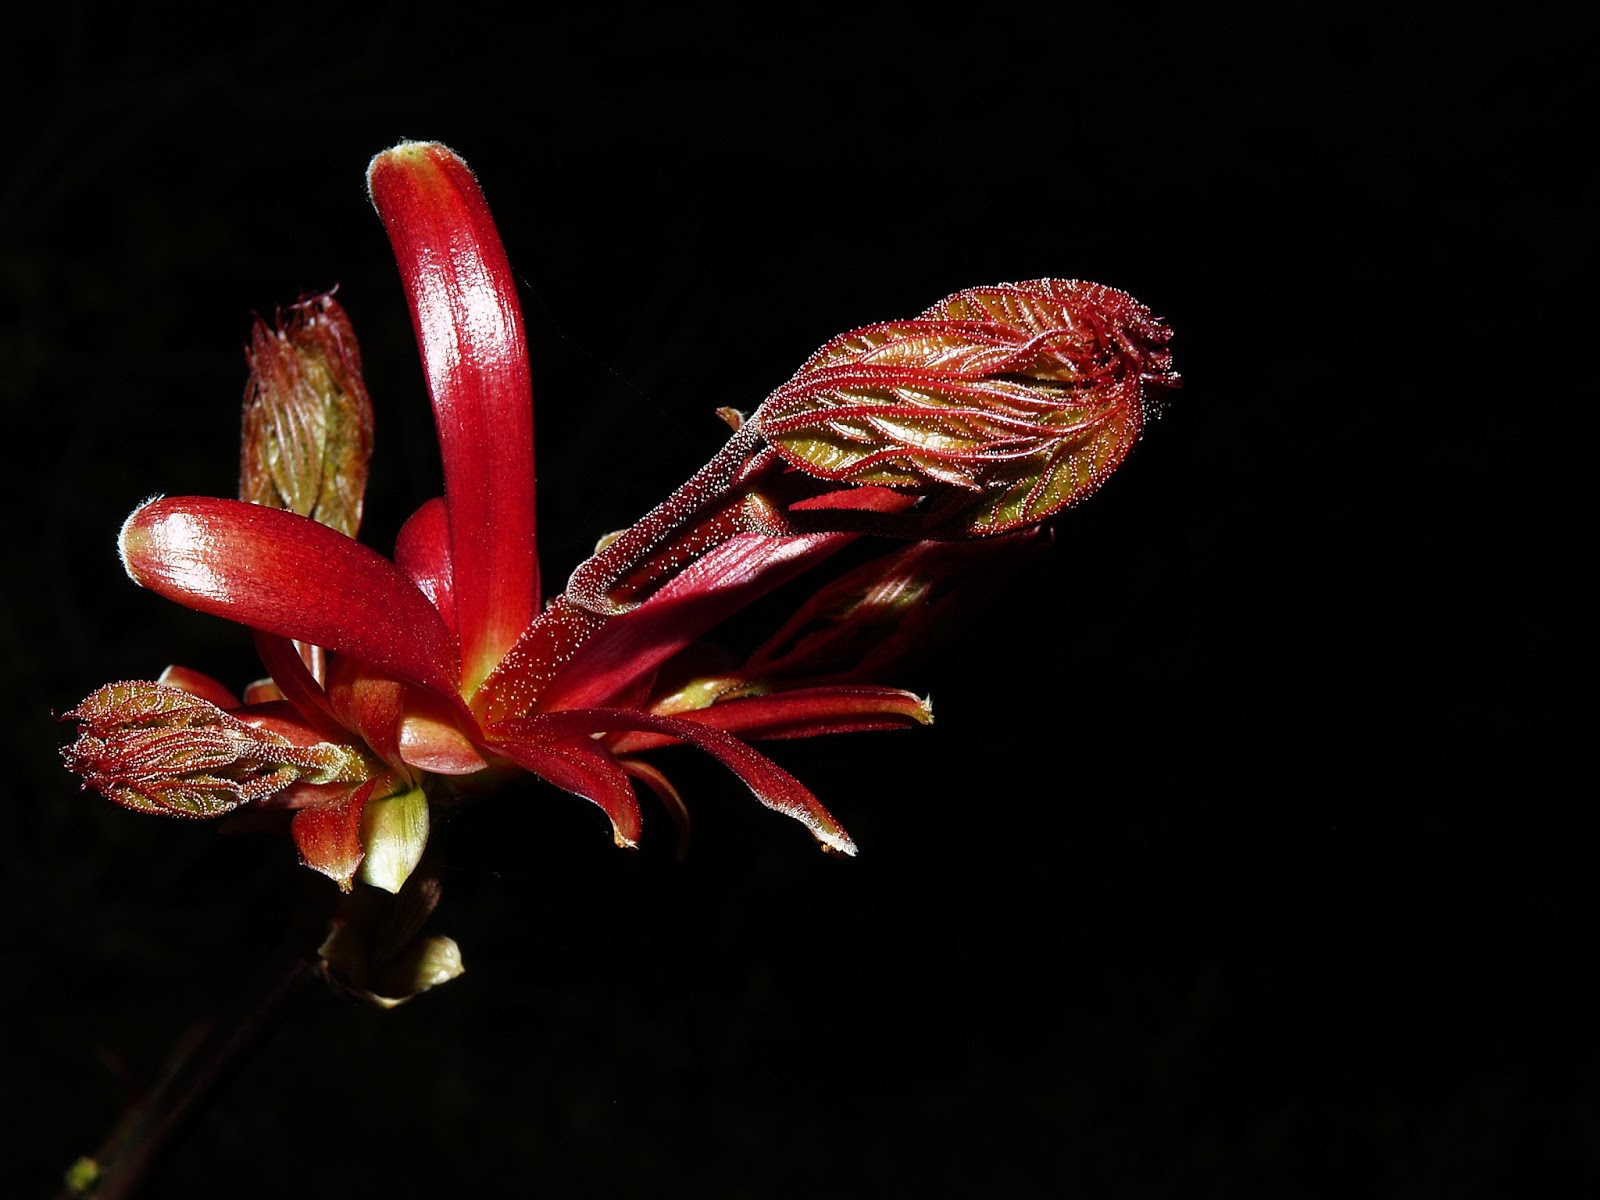
I walked home for a change today, as the weather consisted of glorious sunshine, with a slight breeze to cool the air; in my opinion, the perfect weather! I was about five minutes away from my house and without my camera when I spotted this “flower”, so rushed home and returned with camera at the ready.
I use quotation marks, because in actual fact, it is not a flower, but a bud with leaves at the stem. I liked the way that you have to look closely to see that it isn’t a flower. I was lucky to have spotted this, as I went back the next day to find the leaves open.
I tried to under expose the image as I didn’t want a background, and didn’t have any black card to hand. I used flash to pick out the foreground, with an aperture of F22 to reduce the amount of light, and to make sure that the whole plant was in focus. Also, I used a shutter speed of 1/160, as I was using on camera flash, and this is the sync speed. Upon further inspection, I noticed that the plant had small white hairs along the stem. I sharpened the image in Photoshop to show this, but haven’t done anything else, as I was pleased with the original.
Bex